Access Zone providing Firewall, NAT and OpenVPN Services in a Data Center
The access zone is a SunOS Zone virtual machine, which can be used as a software router, firewall and VPN server.
Creating a Zone with Two NICs
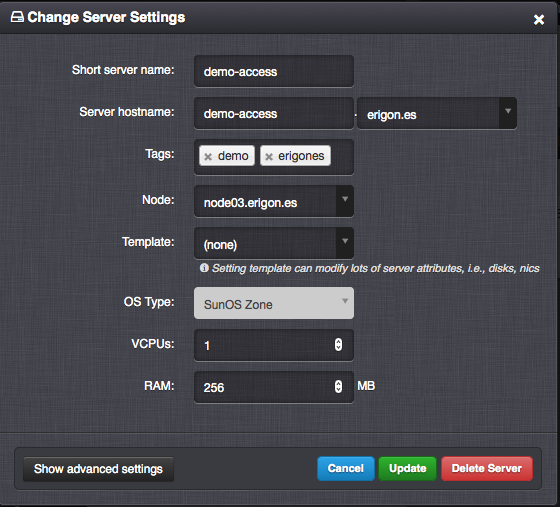
Create an access zone.
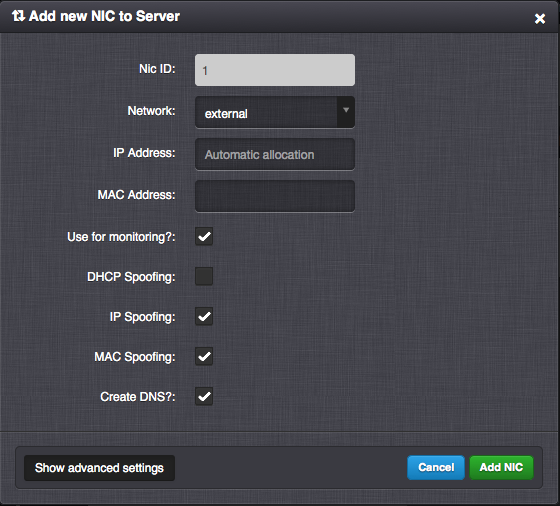
Create a NIC for external network traffic (net0).
Create a NIC for internal network traffic (net1).
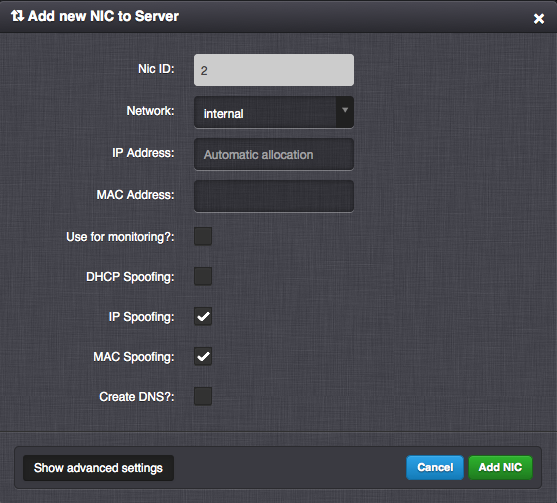
Note
The internal and external NICs must have IP and MAC spoofing enabled. These settings can be enabled only by a SuperAdmin.
Basic Firewall Configuration
Check IP address of both network interfaces.
[root@demo-access ~] ifconfig -a
    lo0: flags=2001000849<UP,LOOPBACK,RUNNING,MULTICAST,IPv4,VIRTUAL> mtu 8232 index 1
        inet 127.0.0.1 netmask ff000000
    net0: flags=201000843<UP,BROADCAST,RUNNING,MULTICAST,IPv4,CoS> mtu 1500 index 2
        inet 111.222.222.234 netmask ffffff00 broadcast 111.222.222.255
        ether e2:19:55:d6:39:da
    net1: flags=201000843<UP,BROADCAST,RUNNING,MULTICAST,IPv4,CoS> mtu 1500 index 3
        inet 10.0.0.50 netmask ffffff00 broadcast 10.0.0.255
        ether 52:b1:7:3c:e9:2f
    lo0: flags=2002000849<UP,LOOPBACK,RUNNING,MULTICAST,IPv6,VIRTUAL> mtu 8252 index 1
    inet6 ::1/128
Adjust basic firewall rules (111.222.222.234 in this case is an IP address of external interface).
[root@demo-access ~] vim /etc/ipf/ipf.conf

# Allow loopback.
pass in quick on lo0
pass out quick on lo0

# Allow everything passing via VPN interface.
pass in quick on tun0
pass out quick on tun0

# Allow everything passing via internal interface.
pass in quick on net1
pass out quick on net1

# Allow everything out to the internet.
pass out quick on net0 keep state

# Allow ssh and openvpn service.
pass in quick on net0 proto udp from any to 111.222.222.234/32 port=1194 keep state
pass in quick on net0 proto tcp from any to 111.222.222.234/32 port=22 keep state
pass in quick on net0 proto icmp from any to 111.222.222.234/32 keep state

# Allow remote nodes access to Danube Cloud services (optional)
pass in quick on net0 proto udp from any to 111.222.222.234/32 port=12181 keep state
pass in quick on net0 proto tcp from any to 111.222.222.234/32 port=15672 keep state
pass in quick on net0 proto tcp from any to 111.222.222.234/32 port=16379 keep state

# Default block rule.
block in quick on net0
Validate the syntax of basic firewall configuration.
[root@demo-access ~] ipf -nf /etc/ipf/ipf.conf
Enable the
ipfilter(firewall) service.[root@demo-access ~] svcadm enable ipfilter
Enable IPv4 forwarding.
[root@demo-access ~] routeadm -u -e ipv4-forwarding
Adding an NAT rule.
[root@demo-access ~] vim /etc/ipf/ipnat.conf

map net0 10.0.0.0/24 -> 111.222.222.234/32 portmap tcp/udp auto
More NAT rules (optional). Please fill in the actual IP addresses of virtual machines mgmt01.local, dns01.local, mon01.local and cfgdb01.local instead of the placeholders like
%%MGMT_IP%%.[root@demo-access ~] vim /etc/ipf/ipnat.conf # Access to GUI/API from internet (mgmt01.local) rdr net0 from any to 111.222.222.234/32 port = 80 -> %%MGMT_IP%% port 80 tcp rdr net0 from any to 111.222.222.234/32 port = 443 -> %%MGMT_IP%% port 443 tcp # Access to integrated DNS from internet (dns01.local) rdr net0 from any to 111.222.222.234/32 port = 53 -> %%DNS_IP%% port 53 tcp/udp # Access to integrated zabbix monitoring from internet (mon01.local) rdr net0 from any to any port = 444 -> %%MON_IP%% port 443 tcp # Allow remote nodes (it is recommended to restrict also source IPs here) rdr net0 from any to 111.222.222.234/32 port = 15672 -> %%MGMT_IP%% port 443 tcp rdr net0 from any to 111.222.222.234/32 port = 16379 -> %%MGMT_IP%% port 443 tcp # Needed only during installation of remote nodes (should point to cfgdb01.local) rdr net0 from any to 111.222.222.234/32 port = 12181 -> %%CFGDB_IP%% port 443 tcp
Validate the syntax of NAT configuration.
[root@demo-access ~] ipnat -nf /etc/ipf/ipnat.conf
Activating changes (service reload).
[root@demo-access ~] svcadm refresh ipfilter
OpenVPN Installation and Configuration
Install OpenVPN.
[root@demo-access ~] pkgin -y in openvpn
Download and unpack the
EasyRSAtool used for management of VPN certificates.[root@demo-access ~] cd /opt/local/etc/openvpn [root@demo-access openvpn] curl -OL \ https://github.com/OpenVPN/easy-rsa/releases/download/v3.0.6/EasyRSA-unix-v3.0.6.tgz [root@demo-access openvpn] gtar xf EasyRSA-unix-v3.0.6.tgz [root@demo-access openvpn] mv EasyRSA-v3.0.6 easy-rsa
Optional
EasyRSAconfiguration.[root@demo-access openvpn] cd easy-rsa [root@demo-access easy-rsa] vim vars export KEY_COUNTRY="SK" export KEY_PROVINCE="Slovakia" export KEY_CITY="Bratislava" export KEY_ORG="Erigones" export KEY_EMAIL="ssl@example.com" export KEY_OU="Erigones VPN Administration"
Fix shell in the easyrsa script. Change the first line in the
easyrsafile to#!/bin/bash. This is because of a bug in easy-rsa.[root@demo-access easy-rsa] vim easyrsa #!/bin/bash
Create PKI certificates for the OpenVPN server.
[root@demo-access easy-rsa] ./easyrsa init-pki
[root@demo-access easy-rsa] ./easyrsa build-ca
[root@demo-access easy-rsa] ./easyrsa build-server-full <server-name> nopass
[root@demo-access easy-rsa] ./easyrsa gen-dh
Configure the OpenVPN server. Some important configuration settings:
- local - IP address of the OpenVPN server.
- server - IP address range for VPN service clients.
- push - IP subnet, that should be added to the client’s routing table.
[root@demo-access ~] vim /opt/local/etc/openvpn/openvpn.conf
proto udp
dev tun
local 111.222.222.234
port 1194
server 10.100.200.0 255.255.255.0
ifconfig-pool-persist /opt/local/etc/openvpn/ipp.txt
keepalive 10 120
comp-lzo
persist-key
persist-tun
verb 3
tls-server
log-append /var/log/openvpn.log

dh /opt/local/etc/openvpn/easy-rsa/pki/dh.pem
ca /opt/local/etc/openvpn/easy-rsa/pki/ca.crt
cert /opt/local/etc/openvpn/easy-rsa/pki/issued/<server-name>.crt
key /opt/local/etc/openvpn/easy-rsa/pki/private/<server-name>.key

push "route 10.0.0.0 255.255.255.0"
Enable the
openvpn(VPN) service.[root@demo-access ~] svcadm enable openvpn
Creating a VPN Client Certificate and Configuring a VPN Client
Create a VPN client certificate.
[root@demo-access ~] cd /opt/local/etc/openvpn/easy-rsa
[root@demo-access easy-rsa] ./easyrsa gen-req firstname.lastname
[root@demo-access easy-rsa] ./easyrsa sign-req client firstname.lastname
Note
You can optionally append a
nopassparameter to the./easyrsa gen-req firstname.lastnamecommand in order to create a client’s private key without a passphrase. This may be suitable for a server-to-server VPN connection and you should protect the private key by other means.Create a VPN client configuration. Please add the content of client’s certificate and key to the configuration.
[root@demo-access ~] vim erigones_vpn.conf
remote demo-access.example.com 1194
proto udp
pull
tls-client
dev tun
nobind
comp-lzo
<ca>
— Contents of ca.crt from /opt/local/etc/openvpn/easy-rsa/pki/ca.crt
</ca>
<cert>
- Contents of firstname.lastname.crt \
from /opt/local/etc/openvpn/easy-rsa/pki/issued/firstname.lastname.crt
</cert>
<key>
- Contents of firstname.lastname.key \
from /opt/local/etc/openvpn/easy-rsa/pki/private/firstname.lastname.key
</key>
Note
OpenVPN client applications may require to be run with administrator privileges, since they need to modify the operating system’s routing table.